XNand Healer GUI v0.75 by Tingedace
New in 0.75
-----------
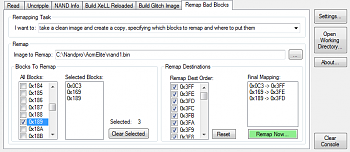
- Added two new types of bad block remapping tasks. Now there are 3 categories:
1. specify an image with bad blocks as a template, and apply the same remapping to a clean image
2. take an image with bad blocks and create a copy with the relocated blocks back in their original locations
3. take a clean image and create a copy, specifying which blocks to remap and where to put them
- Added check to see if image contains ecc (contains zero-paired in block 0x00)
Reported as 'e' icon on main tab and also in Info tab.
- Added check so you can't accidentally overwrite fuses.txt when reading CPU key over LAN
- Added check for block 0x02 relocation so CB can still be correctly read for Info tab
- Now reports bad blocks even if they don’t appear to be remapped anywhere (e.g. 0x1F3 -> ????)
- Removed dependency on nandpro 2.0b. All functions will work properl with any version.
Many thanks to Tiros, Gligli, boby2pc for creating the underlying programs.
Thanks also to Rogero for making such a robust xeBuild app.
Install/Requirements
--------------------
1. Copy XNandHealer.exe to a folder of choice e.g. C:\Nandpro
2. Requires .Net Framework 3.5
3. Requires Nandpro + associated drivers (best results with 2.0b, not tested with 3.0)
4. Extract MultiBuilder 0.7 to a folder of choice e.g. C:\Nandpro\MultiBuilder
Download from :
[url]http://www.tortuga-cove.com/forums/abbcode_page.php?mode=click&id=401[/url]
NOTE: Multi builder (run.exe) is not used/invoked by XNH. It is required as a convenient
package containing all files necessary to run xeBuild.
5. (Optional) Requires FindSecData 0.62 by boby2pc for Uncrippling
Initial setup
-------------
1. Run XNandHealer GUI.
2. Under Settings, confirm the locations of Nandpro.exe, python.exe & xeBuild.exe
(both in ~MultiBuilder\Data\ folder) and optionally FindSecData.exe
3. On the Read Tab, Select the Working directory where your NAND images, logs and fuses will go
Instructions for correct NAND dumping
-------------------------------------
1. Select the desired interface (LPT or USB) and click Detect
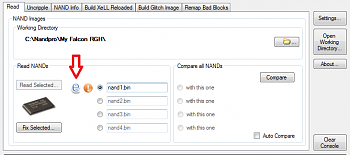
2. Under the Read Tab: Click "Read Selected...", choose which "read slots" you want and
click OK to begin. For big block Jaspers, you may only want to read the first 64MB rather
than the full image. You can use the default filenames or rename them first.
3. Once all reads are complete, Observe the integrity icon against each dumped image.
GREEN TICK = Good dump, no errors or remapped blocks
EXCLAMATION = Good dump, but contains bad blocks. Only attempt to fix if you're not getting exact matching dumps.
RED CROSS = Contains ECC error blocks i.e. read errors. Click "Fix Selected..." to re-dump the offending blocks.
4. Select and fix image if there are any errors
Instructions for Glitch Hack (once glitching hardware is installed)
----------------------------
1. Connect NAND programmer and dump the NAND as per NAND dumping instructions
2. Under Build XeLL Reloaded Tab, select a previously dumped NAND image and click "Build XeLL"
3. Click "Write XeLL To NAND" and let it complete
4. Remove NAND programmer, connect ethernet cable to console and boot console from eject button (take
note of assigned IP)
5. Enter assigned IP address in the box (e.g. 192.168.1.9) and click "Get CPU Key from IP".
"fuses.txt" will be created in the working directory.
6. Under "Build Glitch Image" Tab, select a dumped NAND image and click "Build Glicth Image"
(IMPORTANT! For jaspers, make sure that the Model Type is correct)
7. Reconnect NAND programmer and click "Write Glitch Image To NAND" and let it complete.
(No need to remap any bad blocks, xeBuild will have already done it)
8. Remove NAND programmer, and enjoy your glitch-hacked console.
Instructions to Uncripple
-------------------------
1. Under Write Tab: Select a NAND image file and click FindSecData. A list of recommended
patches will be displayed.
2. Select the first in the list and click Write NAND, and you're done!
In some cases you may need to keep going through the list of patches until it works.
Features:
* The fastest most convenient and most reliable way to ensure correct image dumps
* Automated creation and flashing of XeLL Reloaded and glitch image
* Able to detect and fix any errors in a NAND dump, making this an excellent aid to JTAG'ing / RGH'ing
* Automatically remap bad blocks - e.g. remap your freeBOOT image to match the original
* Supports all NAND types, small block and big block
* Tell at a glance if your console has an expolitable "CB" for JTAGging
* Provides automated process to uncripple using the existing excellent
tools: Nandpro and FindSecData
* Recognises and supports uncrippling for all NAND types 16MB, 256MB, 512MB and slims
* Automatically shows if NANDs are identical at a glance as soon as they're dumped
* Previews the exact write commands to be used before writing
(Nothing is written back to the NAND without the user seeing the commands first)
* Easily manage folders containing lots of NAND dumps if you're handling multiple
consoles
Notes/Issues:
* Block numbers of Big Block NANDs are shown in blue to distinguish them from blocks numbers
of small block NANDs. I did this because Nandpro always deals in small block sizes, even when
reading and writing big block images. Therefore, if you plan to use Nandpro natively based on
any block numbers read out from XNH, then make sure to multiply big block values (shown in blue)
by 8 before plugging them into Nandpro
* Sometimes Nandpro 2.0d and 2.0e will refuse to read a virtual nand file. I don't
know why it reads some and not others but the only solution I've found that works is to use 2.0b
Revision History
----------------
0.74 - Now automatically remaps the original NAND before creating the ecc image.
Previously the ecc glitch generation was not working in all cases e.g. bad
blocks in the first 0x50.
- Added creation of launch.ini file. Choose from an existing preset or define your own.
0.73 - This release is for small but important change to the build glitch image feature. It's possible
for another Multibuilder operation e.g. "build JTAG image with custom smc" to leave an smc.bin file
in the Data\my360 folder. The next time xeBuild is invoked by Xnandhealer (or from cmd line) the build
would erroneously pick up this smc and cause a bad image build.
Now any leftover smc.bin file that may be present in the Data\my360 folder will be removed before
building the image, thus ensuring the correct smc is always used.
0.72 - Supports xeBuild 14699 and Multibuilder 0.6 (old ggBuild now not supported)
- Supports automatic XeLL bad block remapping in first 0x50 blocks (first 0x10 big blocks)
- Added option for including dashlaunch patches or not
- Added 'Glitchable' CB check (as well as JTAGable check)
- Added convenient button to open windows explorer at the working directory
- Updated known CB list with non-glitchable CBs 4577, 5772 & 6752
- Changed: USB is now the default interface instead of LPT
- Changed: Now uses xell image + other files from Multibuilder folder and removed embedded versions
- Changed: Removed in-built fcrt extractor (xeBuild does it now) Fixed: Unable to select Jasp16 SB or
BB in Build XeLL tab or Build Glitch tab
- Fixed: Relocated bad blocks could be reported in reverse order in a very few cases
0.71 - Fixed the problem of not building XeLL if there was a space in the Working Directory pathname
0.7 - Carry out the glitch hack from start to finish using one application!
- Creation of image_00000000.ecc (XeLL) for Glitch Hack based on original nand dump
- Creation of full Glitch Hack image (using ggBuild) for all model types
- One-click CPU key retreival from XeLL over LAN (and creation of fuses.txt)
- One-click CPU key retreival from fuses.txt file
- Added support for trinity NAND image analysis
- Thanks to BestPig for revealing how to extract fcrt.
0.6 - Now able to browse to and select any file for Image Analysis or Remapping
- Option to Dump KV and config files either as part of the initial dump or afterwards
- Add 2 second delay between reads
- Fixed bug with file locations in the settings where it wouldn't work with a space in the path
0.51 - Supports Multiple Reads in one go
- Escape to cancel analysis
- Changed default read length option from 66 to 64
0.5 - Much improved user interface including progress bars during NAND analysis
- Ability to cancel NAND analysis
- One-click bad block remapping
- Added dialog to let you choose how much of the NAND to dump just before reading
- Fixed bug where big blocks with empty pages (filled with 0x00) could be reported as ECC errors
0.4 - Big Block analysis and fixing now supported
- Now have the choice to fix NAND either from actual NAND or a virtual nand (image file)
- Added "CB" readout and exploitable indicator
- Added partial NAND analysis - can analyze images even if they don't start at block 0
- Added Absolute and Relative addressing in the Hex Viewer (to accompany partial NAND analysis)
0.31 - Added support for detection of other 16MB NAND with flashconfig 0x00023010
0.3 - Added new capability to analyze and report the integrity of each NAND dump – it
reports bad blocks and ECC error blocks (BB NANDs not yet supported)
- Added “Fix NAND” feature to automatically re-dump any offending blocks and patch
them into the original dump (BB NANDs not yet supported)
- There is also the option to re-dump the bad blocks, although they shouldn’t matter
(since they’ve been remapped) you may occasionally need to re-dump the bad block just
to get an overall matching dump and increase confidence.
- Added “NAND Info” tab, which displays any remapped blocks and ECC error blocks and
some basic info about the file (BB NANDs not yet supported)
- Added very basic Hex Viewer, more of a debug feature but allows you to view dump by
block/page.
0.2 - Some image updates and graphical enhancements
0.1 - Initial version.


 1Likes
 LinkBack URL
 About LinkBacks


 Rispondi Citando


Segnalibri